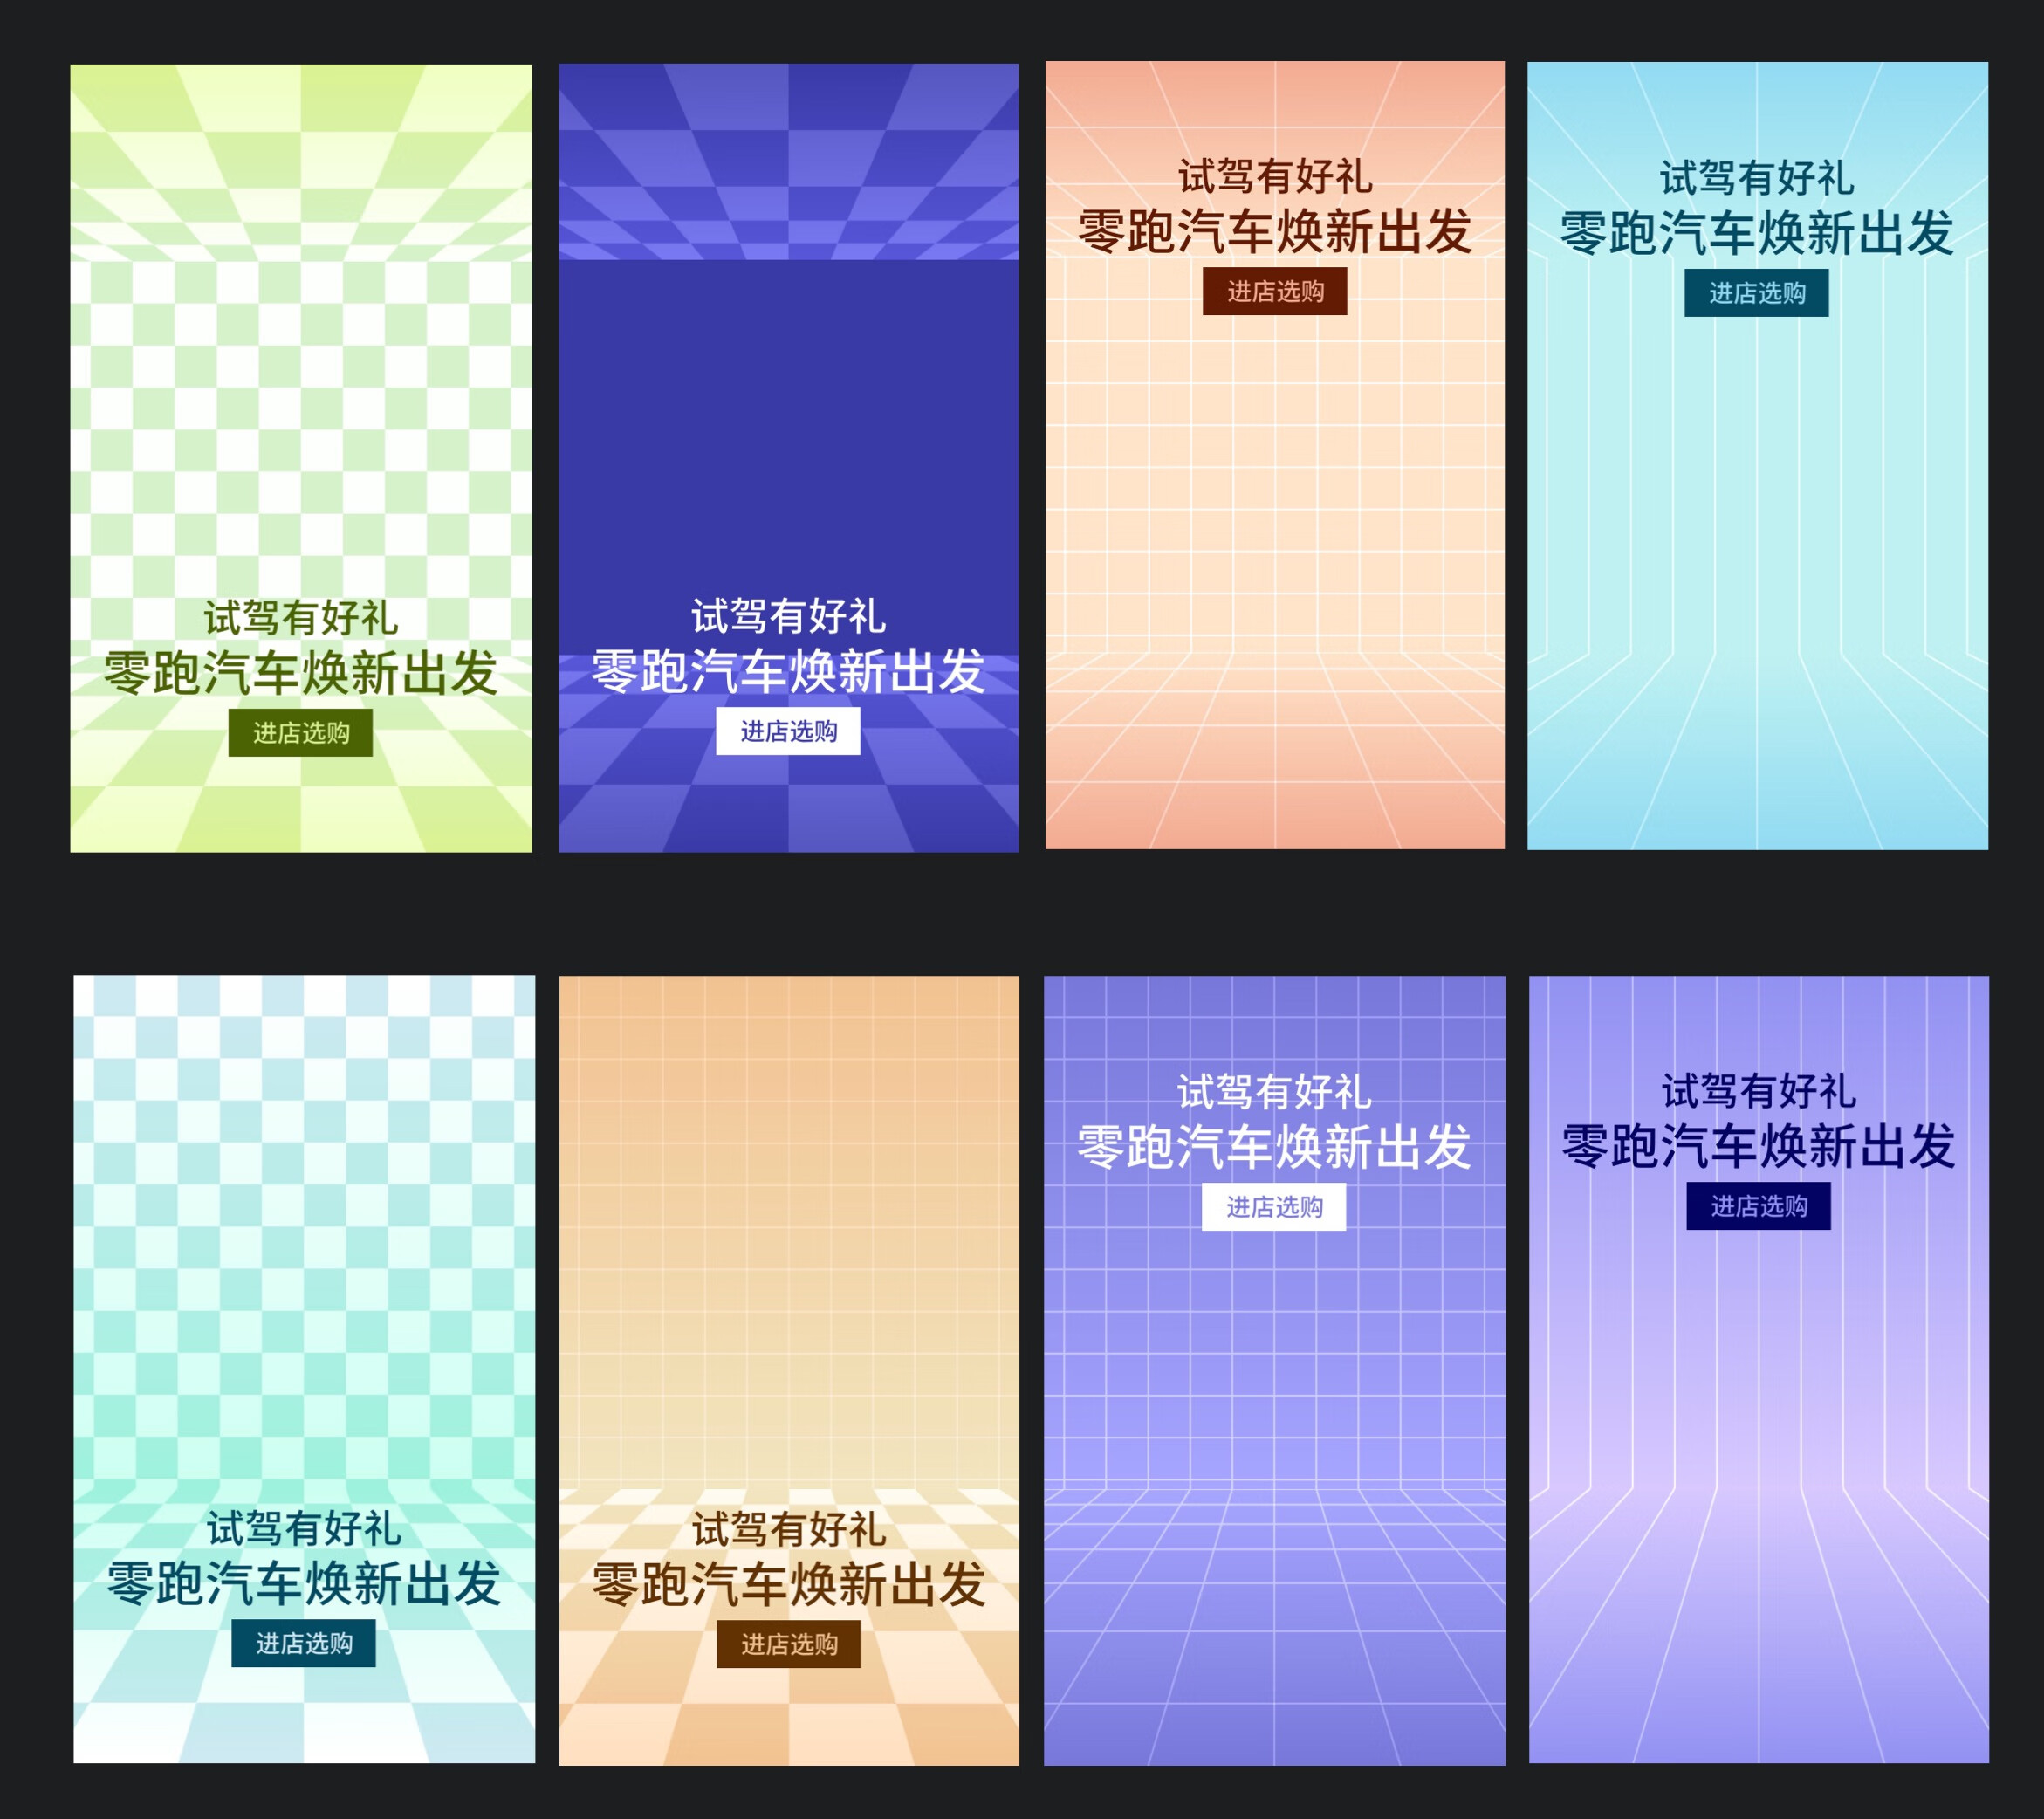
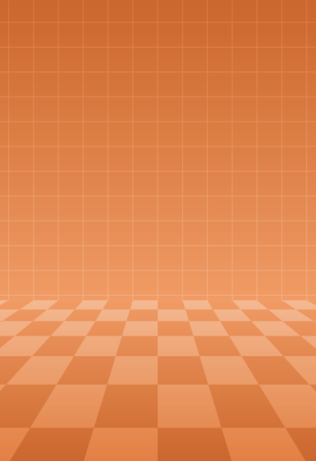
在羚珑智能设计工具——程序化设计里,我们需要根据设计师给到的作图规范来绘制对应的图形,通过输入不同的参数输出不同的设计结果,上面背景图就是程序化设计里一个2.5D背景模型生成图片的一些例子。那我们使用的绘图工具就是 skia。
# 1.Skia
# 1.1 Skia 简单介绍
Skia 是一个开源 2D 图形库,它提供适用于各种硬件和软件平台的通用 API。 它作为 Google Chrome 和 ChromeOS、Android、Flutter 和许多其他产品的图形引擎。Skia 支持多语言调用, C++/C#/Java/Python/Rust/WASM 等。
程序化设计有浏览器端以及服务端的绘制需求,所以我们选择 canvaskit-wasm (opens new window) 这个 Skia 打包出来的供 JS 调用的 WebAssembly NPM 包,在 web 端以及 nodejs 端都能使用,这样就满足了多端的需求。
# 1.2 常用绘图 API
Surface
Surface 是一个对象,用于管理绘制画布命令的内存,通过处理这段内存信息,可以将它转成图片。
下面的代码显示如何加载这个包并进行 API 调用:
import CanvasKitInit from 'canvaskit-wasm'

const loadLib = CanvasKitInit({
  locateFile(file) {
    return 'https://unpkg.com/canvaskit-wasm@0.19.0/bin/' + file
  }
})

loadLib.then(lib => {
  // 创建 500x500 的 surface
  const surface = lib.MakeSurface(500, 500)
  // 获取画布
  const canvas = surface.getCanvas()
})
Canvas
Canvas 是 Skia 绘图上下文,它提供了绘图的接口。
- canvas.drawRect():绘制一个矩形
- canvas.drawCircle():绘制一个圆
- canvas.drawLine():绘制一条直线
- canvas.drawPath():绘制一条路径
- canvas.drawArc():绘制一条圆弧
- canvas.drawText():绘制文字
- ...
Path
Path 绘制路径。
- path.moveTo(x, y):从(x,y)开始绘制一个路径
- path.lineTo():将直线添加到路径
- path.arcTo():将弧线添加到路径
- path.cubicTo():添加贝塞尔曲线
- path.quadTo():添加二次贝齐尔曲线
- path.close():闭合路径
- path.addRect():添加一个矩形到路径
- path.addCircle():添加圆
- path.addOval():添加椭圆
- path.addRoundedRect():添加圆角矩形
- path.addArc():添加圆弧
- path.addPath():添加另一个路径
- ...
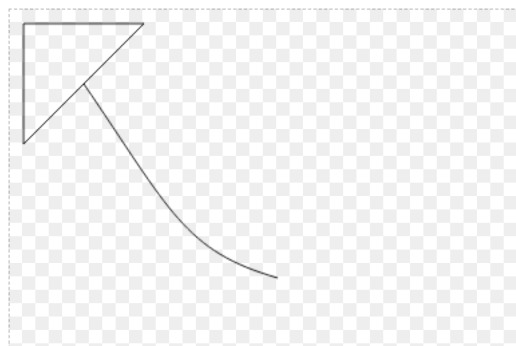
Path 绘制例1:
// 绘制三角形
const path = new CanvasKit.Path()
path.moveTo(10, 10)
path.lineTo(100, 10)
path.lineTo(10, 100)
path.close()

// 绘制贝塞尔曲线
const arcPath = new CanvasKit.Path()
arcPath.moveTo(55, 55)
arcPath.cubicTo(120, 150, 130, 180, 200, 200)

// 添加曲线路径
path.addPath(arcPath)

canvas.drawPath(path, paint) // paint 画笔,见下文
绘制结果:
Paint
Paint 画笔,用于存储当前绘制图形的样式信息。
- paint.setColor():设置画笔颜色
- paint.setAlphaf():设置透明度
- paint.setAntiAlias():抗锯齿
- paint.setBlendMode():设置混合模式
- paint.setStyle():设置画笔样式
- paint.setStrokeWidth():设置描边宽度
- paint.setColorFilter():设置颜色筛选器
- paint.setImageFilter():设置图像筛选器
- paint.setMaskFilter():设置掩码筛选器
- paint.setShader():设置着色器
- ...
例1 中需要加上 Paint 进行样式绘制:
const { Path, parseColorString } = CanvasKit

const paint = new Paint()
paint.setStyle(PaintStyle.Stroke)
paint.setColor(parseColorString('#000000'))

canvas.drawPath(path, paint)
Shader
Shader 着色器,用于绘制渐变、噪声、平铺等效果。
- shader.MakeColor():设置着色器颜色
- shader.MakeLinearGradient():线性渐变
- shader.MakeRadialGradient():径向渐变
- shader.MakeSweepGradient():扫描渐变
- shader.MakeTwoPointConicalGradient():两点圆锥渐变
- shader.MakeFractalNoise():柏林噪声
- shader.MakeTurbulence():平铺柏林噪声
- shader.MakeBlend():组合多个着色器效果
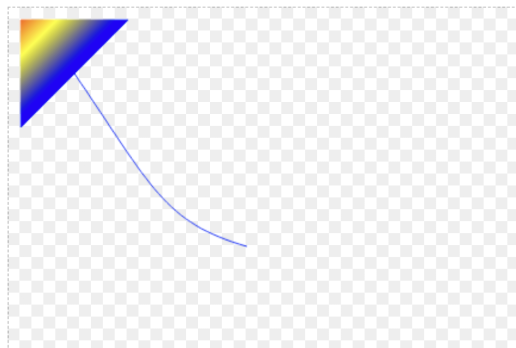
Shader 绘制例2:
const { Shader, parseColorString, TileMode } = CanvasKit

const shader = Shader.MakeLinearGradient(
  [0, 0], // 渐变开始点
  [50, 50], // 渐变结束点
  [
    parseColorString('#ff0000'),
    parseColorString('#ffff00'),
    parseColorString('#0000ff')
  ], // 渐变颜色
  [0, 0.5, 1], // 颜色范围比例
  TileMode.Clamp, // 范围外颜色样式模式
)

paint.setShader(shader)
绘制结果:
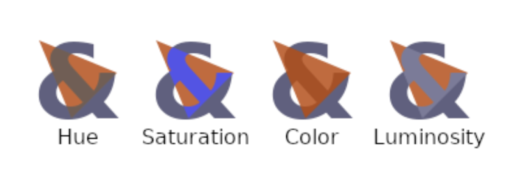
Blendmode
Blendmode 混合模式,用于确定当两个图形对象互相重叠时需要如何绘制。主要分为三大类:
| Porter-Duff | 分离 | 不可分离 |
|---|---|---|
| Clear | Modulate | Hue |
| Src | Overlay | Saturation |
| Dst | Darken | Color |
| SrcOver | Lighten | Luminosity |
| DstOver | ColorDodge | - |
| SrcIn | ColorBurn | - |
| DstIn | HardLight | - |
| SrcOut | SoftLight | - |
| DstOut | Difference | - |
| SrcATop | Exclusion | - |
| DstATop | Multiply | - |
| Xor | - | - |
| Plus | - | - |
Porter-Duff 模式:通常用于执行裁剪操作
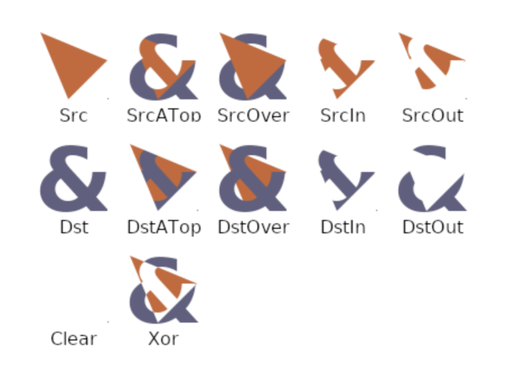
可分离混合模式:可以混合颜色,通常用于照亮或变暗图像。
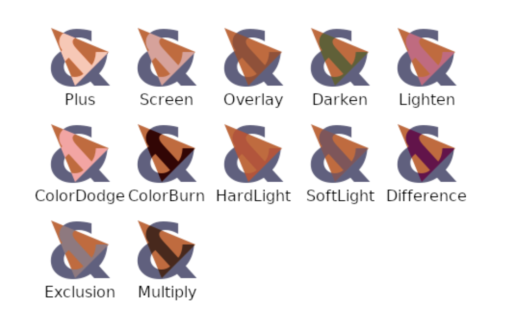
不可分离混合模式:可以混合颜色,通常通过对色调、饱和度和亮度颜色级别进行操作。
Matrix
Matrix 矩阵工具,用于图形变换、数学计算等,主要有三个:
- ColorMatrix: 用于计算颜色
- Matrix: 3x3矩阵计算,常用于二维图形变换
- M44: 4x4矩阵计算,三维图形变换
矩阵是图形变换不可或缺的计算工具,接下来详细阐述一下关于二维图形变换的工具——Matrix。
# 2. 图形变换
所有的图形变换本质上是点的坐标变换,即:
(x, y) => (x', y')
要实现点的坐标变换,需要借助一个中间矩阵与坐标点相乘之后得到变换结果:
(x, y) × 中间矩阵 = (x', y')
在 Skia 中需要借助一个 3x3 的矩阵进行坐标变换(原因见下文):
                │ ScaleX  SkewY   Persp0 │
| x  y  1 |  ×  │ SkewX   ScaleY  Persp1 │ = | x'  y'  z' |
                │ TransX  TransY  Persp2 │
这里可以理解为在三维的某个面上进行图形变换,为了方便计算,我们将 z 值设为 1,相当于在 z 值为 1 的平面上进行变换:
z' = 1
xFinal = x' / z' = x'
yFinal = y' / z' = y'
最后就得到了最终变换的结果:
(x, y) => (xFinal, yFinal)
Skia 中也提供了一个方便的方法实现坐标变换:
Matrix.mapPoints(mat, [x, y]) // 得到经 mat 矩阵变换之后的 x/y 坐标
Skia 中的坐标系与经典直角坐标系(笛卡尔坐标系)有所区别,它的 y 轴正方向是向下的,所以变换矩阵也有一些区别。
接下来详细介绍一下常见的图形变换。
# 2.1 平移变换
平移变换在水平方向和垂直方向移动图形对象,如下图宽高为 1 的矩形(单位矩形)由 (0,0) 点向 x 轴移动到 X,向 y 轴移动到 Y:
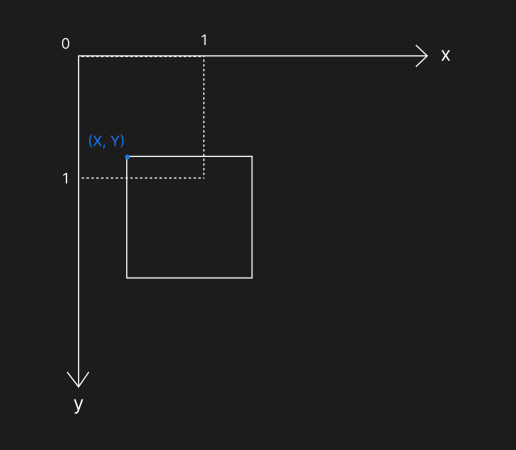
平移变换的中间矩阵:
                │ 1  0  0 │
| x  y  1 |  ×  │ 0  1  0 │ = | x'  y'  1 |
                │ X  Y  1 │
这里可以解释一下为何需要使用 3x3 矩阵去做变换,是因为二维矩阵无法表达 平移 这种最基础的图形变换,2x2 矩阵表示两个维度中的线性变换,线性变换无法改变 (0,0),所以需要借助升维来解决。见参考资料 (opens new window)。
在 Skia 中可以使用 Matrix.translated() 方法来方便做平移变换:
Matrix.translated(X, Y)
# 2.2 缩放变换
缩放变换会更改图形对象的大小,如下图矩形在 x 方向上缩放了 W 倍,在 y 方向上缩放了 H 倍:
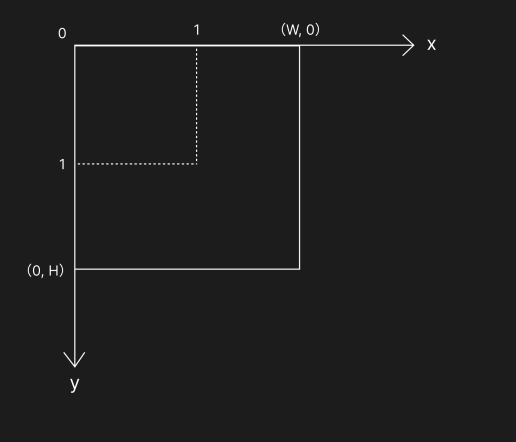
缩放变换的中间矩阵:
                │ W  0  0 │
| x  y  1 |  ×  │ 0  H  0 │ = | x'  y'  1 |
                │ 0  0  1 │
在 Skia 中可以使用 Matrix.scaled() 方法来方便做缩放变换:
Matrix.scaled(W, H)
# 2.3 旋转变换
旋转变换使图形围绕某个点进行旋转,如下图矩形围绕着 (0,0) 旋转了 θ 度:
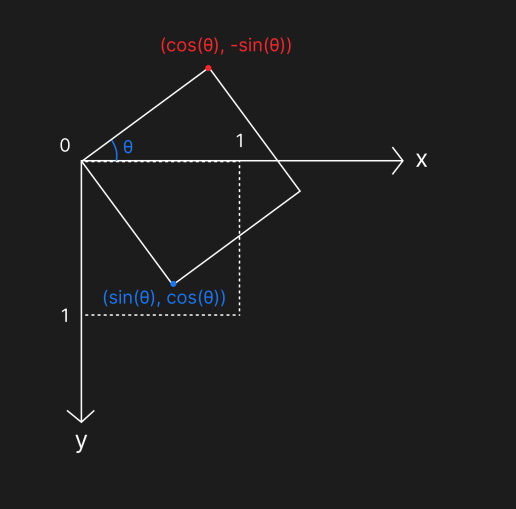
旋转变换的中间矩阵:
                │  cos(θ)  sin(θ)  0 │
| x  y  1 |  ×  │ -sin(θ)  cos(θ)  0 │ = | x'  y'  1 |
                │    0       0     1 │
在 Skia 中可以使用 Matrix.rotated() 方法来方便做旋转变换:
Matrix.rotated(toRadians(θ), 0, 0) // 需要将角度转换为弧度
# 2.4 倾斜变换
倾斜变换可以使图形在水平或垂直方向上倾斜。
如下图在垂直方向上倾斜了 α 度:
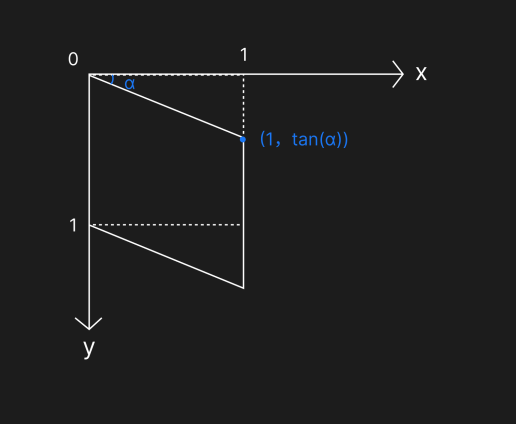
下图在水平方向上倾斜了 θ 度:
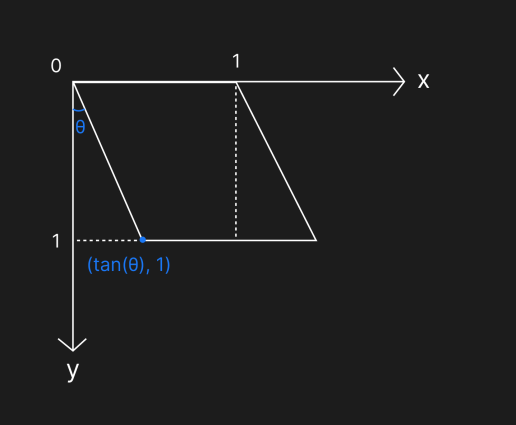
倾斜变换的中间矩阵:
                │    1     tan(α)  0 │
| x  y  1 |  ×  │  tan(θ)    1     0 │ = | x'  y'  1 |
                │    0       0     1 │
在 Skia 中可以使用 Matrix.skewed() 方法来方便做倾斜变换:
Matrix.skewed(tan(α), tan(θ), 0, 0)
# 2.5 透视变换
透视变换可以实现图形的透视效果,它可以使矩形变换成任意凸四边形,下图将底边在水平方向分别扩展了 X1、X2 的距离:
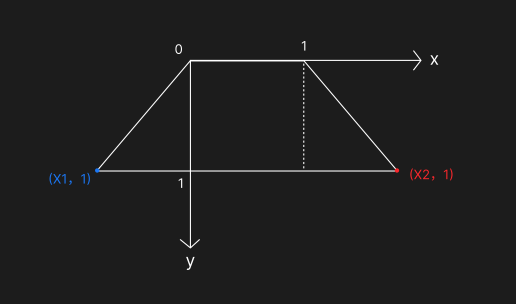
由此,我们可以知道变换前以及变换后每个顶点的坐标,通过这些坐标值,可以计算透视中间矩阵。
首先,通过 Skia 的中间矩阵变换计算可以得到以下公式:
x' = ScaleX·x + SkewX·y + TransX
y' = SkewY·x + ScaleY·y + TransY
z' = Persp0·x + Persp1·y + Persp2

xFinal = x' / z'
yFinal = y' / z'
z' = 1
于是可以得到 xFinal, yFinal:
xFinal = (ScaleX·x + SkewX·y + TransX) / (Persp0·x + Persp1·y + Persp2)
yFinal = (SkewY·x + ScaleY·y + TransY) / (Persp0·x + Persp1·y + Persp2)
将变换前的 (0, 0)、(w, 0)、(0, h)、(w, h) 以及变换后的 (x1, y1)、(x2, y2)、(x3, y3)、(x4, y4) 代入公式:
x1 = (ScaleX·0 + SkewX·0 + TransX) / (Persp0·0 + Persp1·0 + Persp2)
y1 = (SkewY·0 + ScaleY·0 + TransY) / (Persp0·0 + Persp1·0 + Persp2)

x2 = (ScaleX·w + SkewX·0 + TransX) / (Persp0·w + Persp1·0 + Persp2)
y2 = (SkewY·w + ScaleY·0 + TransY) / (Persp0·w + Persp1·0 + Persp2)

x3 = (ScaleX·w + SkewX·h + TransX) / (Persp0·w + Persp1·h + Persp2)
y3 = (SkewY·w + ScaleY·h + TransY) / (Persp0·w + Persp1·h + Persp2)

x4 = (ScaleX·0 + SkewX·h + TransX) / (Persp0·0 + Persp1·h + Persp2)
y4 = (SkewY·0 + ScaleY·h + TransY) / (Persp0·0 + Persp1·h + Persp2)
简化之后:
x1·Persp2 - TransX = 0
y1·Persp2 - TransY = 0

Persp0·w·x2 + Persp2·x2 - ScaleX·w - TransX = 0
Persp0·w·y2 + Persp2·y2 - SkewY·w - TransY = 0

Persp0·w·x3 + Persp1·h·x3 + Persp2·x3 - ScaleX·w - SkewX·h - TransX = 0
Persp0·w·y3 + Persp1·h·y3 + Persp2·y3 - SkewY·w - ScaleY·h - TransY = 0

Persp1·h·x4 + Persp2·x4 - SkewX·h - TransX = 0
Persp1·h·y4 + Persp2·y4 - ScaleY·h - TransY = 0
最后,将具体的坐标值代入,就能将最终值求解出。
以下是最终参考计算方法:
export type Point = { x: number; y: number }

export function createPerspectiveMatrixFromPoints(
  topLeft: Point,
  topRight: Point,
  botRight: Point,
  botLeft: Point,
  w: number,
  h: number,
) {
  const { x: x1, y: y1 } = topLeft
  const { x: x2, y: y2 } = topRight
  const { x: x3, y: y3 } = botRight
  const { x: x4, y: y4 } = botLeft

  const scaleX =
    (y1 * x2 * x4 -
      x1 * y2 * x4 +
      x1 * y3 * x4 -
      x2 * y3 * x4 -
      y1 * x2 * x3 +
      x1 * y2 * x3 -
      x1 * y4 * x3 +
      x2 * y4 * x3) /
    (x2 * y3 * w + y2 * x4 * w - y3 * x4 * w - x2 * y4 * w - y2 * w * x3 + y4 * w * x3)
  const skewX =
    (-x1 * x2 * y3 -
      y1 * x2 * x4 +
      x2 * y3 * x4 +
      x1 * x2 * y4 +
      x1 * y2 * x3 +
      y1 * x4 * x3 -
      y2 * x4 * x3 -
      x1 * y4 * x3) /
    (x2 * y3 * h + y2 * x4 * h - y3 * x4 * h - x2 * y4 * h - y2 * h * x3 + y4 * h * x3)
  const transX = x1
  const skewY =
    (-y1 * x2 * y3 +
      x1 * y2 * y3 +
      y1 * y3 * x4 -
      y2 * y3 * x4 +
      y1 * x2 * y4 -
      x1 * y2 * y4 -
      y1 * y4 * x3 +
      y2 * y4 * x3) /
    (x2 * y3 * w + y2 * x4 * w - y3 * x4 * w - x2 * y4 * w - y2 * w * x3 + y4 * w * x3)
  const scaleY =
    (-y1 * x2 * y3 -
      y1 * y2 * x4 +
      y1 * y3 * x4 +
      x1 * y2 * y4 -
      x1 * y3 * y4 +
      x2 * y3 * y4 +
      y1 * y2 * x3 -
      y2 * y4 * x3) /
    (x2 * y3 * h + y2 * x4 * h - y3 * x4 * h - x2 * y4 * h - y2 * h * x3 + y4 * h * x3)
  const transY = y1
  const persp0 =
    (x1 * y3 - x2 * y3 + y1 * x4 - y2 * x4 - x1 * y4 + x2 * y4 - y1 * x3 + y2 * x3) /
    (x2 * y3 * w + y2 * x4 * w - y3 * x4 * w - x2 * y4 * w - y2 * w * x3 + y4 * w * x3)
  const persp1 =
    (-y1 * x2 + x1 * y2 - x1 * y3 - y2 * x4 + y3 * x4 + x2 * y4 + y1 * x3 - y4 * x3) /
    (x2 * y3 * h + y2 * x4 * h - y3 * x4 * h - x2 * y4 * h - y2 * h * x3 + y4 * h * x3)
  const persp2 = 1

  return [scaleX, skewX, transX, skewY, scaleY, transY, persp0, persp1, persp2]
}
# 3 绘制举例
拿文章开头 2.5D 模型的例子,来绘制一个这样的图形:
# 3.1 图层分析
这个图形主要由上下两部分组成。上部分由一个渐变背景层以及一个方格覆盖层组成,需要进行背景颜色渐变以及方格绘制;下部分由一个渐变背景层以及一个棋盘格覆盖层组成,同样需要背景颜色渐变以及方格绘制,同时图形有透视效果,需要进行透视变换。
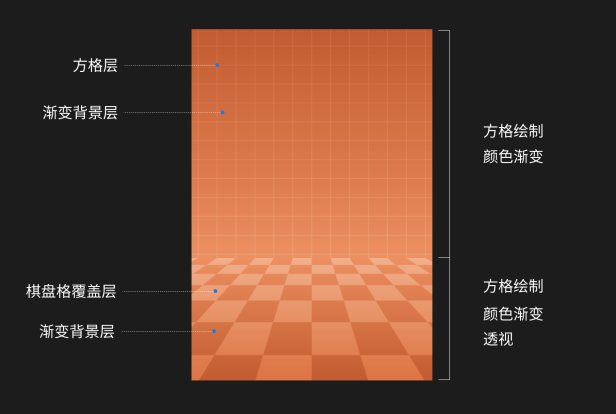
由此,可以将该图形拆解成上下两个部分,因为同样由方格层以及背景层组成,其实可以将之绘制成一个图形,通过输入不同的参数进行变化(透视、方格填色)。
# 3.2 图形绘制
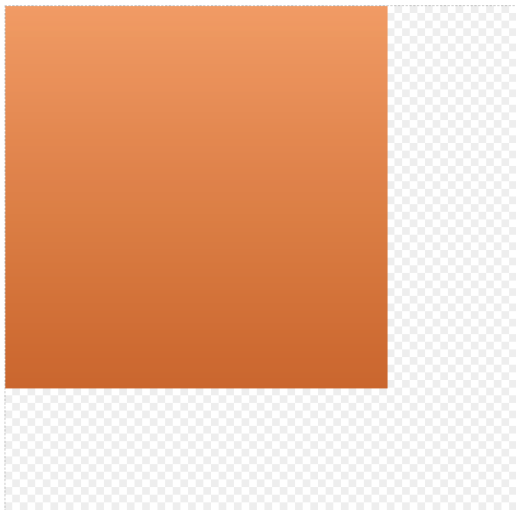
背景层
- 给整个图形画一个方框,加上渐变着色器即完成背景绘制。
const backgroundPaint = new Paint()
backgroundPaint.setStyle(PaintStyle.Fill)

const points = {
  begin: [0, height],
  end: [0, 0],
}

const colors = [parseColorString(beginColor), parseColorString(endColor)]
const shader = Shader.MakeLinearGradient(points.begin, points.end, colors, [0, 1], TileMode.Clamp) // 渐变

backgroundPaint.setShader(shader)

// 绘制矩形
canvas.drawRect(Rect.makeXYWH(0, 0, width, height).toArray(), backgroundPaint)
绘制结果:
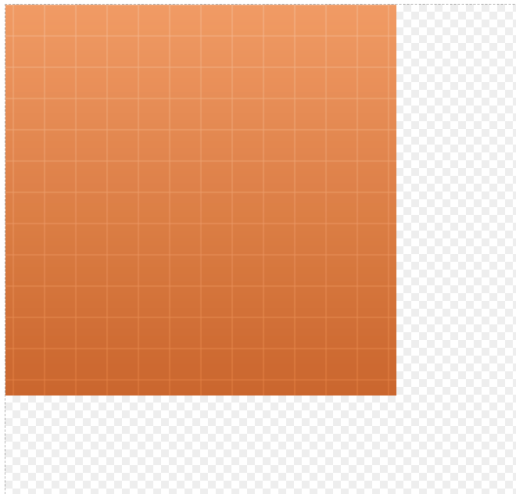
方格层
- 根据画布宽高和间距计算出 x 方向和 y 方向上绘制的方格个数 + 1,然后根据奇偶数排列绘制矩形,并使用平移矩阵将整体居中。
- 针对方格层图形进行渐变颜色填充或线条颜色填充绘制。
const rectsPath = new Path()
for (let i = 0; i < lineNum + 1; i++) { // 循环遍历绘制方格
  for (let j = 0; j < yLineNum + 1; j++) {
    if (i % 2 === 0 && j % 2 === 0) {
      const rect = Rect.makeXYWH(rectSize * i, rectSize * j, rectSize, rectSize)
      rectsPath.addRect(rect.toArray())
    }

    if (i % 2 === 1 && j % 2 === 1) {
      const rect = Rect.makeXYWH(rectSize * i, rectSize * j, rectSize, rectSize)
      rectsPath.addRect(rect.toArray())
    }
  }
}

const overlayShader =  Shader.MakeLinearGradient( // 方格层渐变
  points.begin,
  points.end,
  overlayColors,
  [0, 1],
  TileMode.Clamp,
)

const rectsPaint = new Paint()
rectsPaint.setAntiAlias(true)
rectsPaint.setStyle(PaintStyle.Stroke)
rectsPaint.setShader(overlayShader)

canvas.drawPath(rectsPath, rectsPaint)
绘制结果:
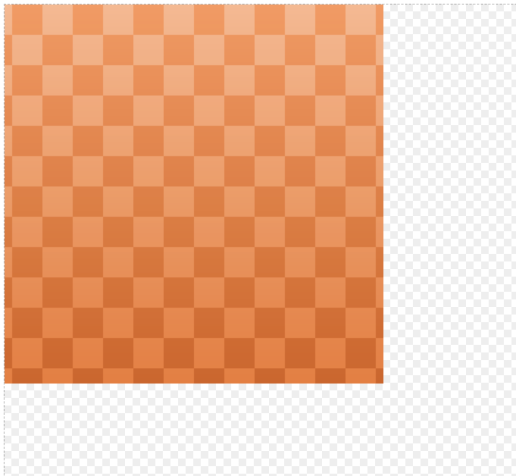
棋盘方格
- 棋盘方格只需要将方格层绘制样式设置为填充即可。
rectsPaint.setStyle(PaintStyle.Fill)

canvas.drawPath(rectsPath, rectsPaint)
绘制结果:
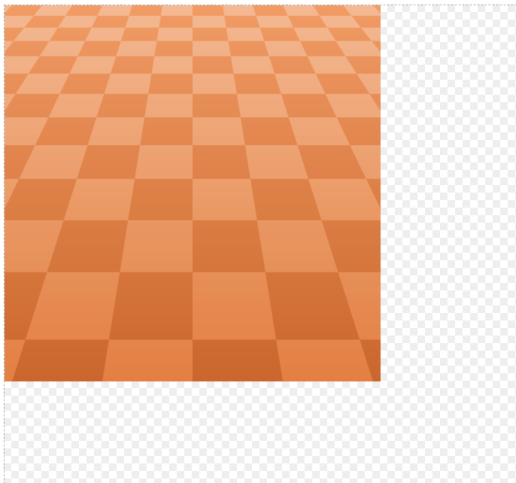
透视方格
- 将方格层加上透视变换即可实现透视效果。
// 透视矩阵
const m = getPerspectiveMatrix(width, height)
// 矩阵变换
rectsPath.transform(m)

canvas.drawPath(rectsPath, rectsPaint)
绘制结果:
图形组合
- 将方格层图形与透视方格图形组合。
<>
  <PerpectiveRect
    width={512}
    height={450}
    beginColor={c0}
    endColor={c3}
    isGradient
  />
  <PerpectiveRect
    width={512}
    height={300}
    beginColor={c0}
    endColor={c3}
    isGradient      // 是否渐变
    isPerspective   // 是否透视
    isXRect         // 是否棋盘格
  />
</>
绘制结果:

# 参考资料
https://stackoverflow.com/questions/48416118/perspective-transform-in-skia (opens new window)